Adding a New Blog Post
There are 2 ways you can add a new blog post to your website.
Recommended Way
- Our first suggestion is to create a section Under Construction named something like "Pending Blog Posts". Under that page you'll create sub pages that are Under Construction for the blog posts that you're working on. You can add your text modules, photo galleries, module suckers - whatever.
- When you're ready to post the blog entry, you'll need to go to the page properties of that web page.
- Click the "Convert to Blog Post" link

- Modify the Date Created.

- Add Tags: Underneath the tag field you'll see "Popular tags". The CMS will automatically show a list of tags that already exist. Start typing the name of the tag you would like to assign to that blog post and then select the tag name that appears below the tag field. To add a new tag that doesn't exist, type the word (or words separated by a dash) and click Tab.
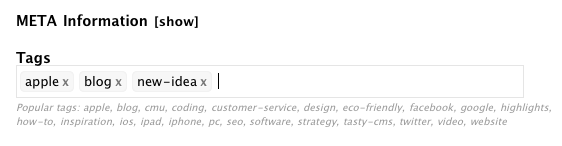
This will create a new Tag Category.
Please note: Tags are assigned to blog posts so that users can easily search for topics in the blog section under the Tags drop-down list. We recommend to use the tag categories sparingly and create tags for topics you want to easily call out in the blog section and topics that you have or will have multiple blog posts about.
*Key words are converted to tags when you convert a page under construction to a blog post page.
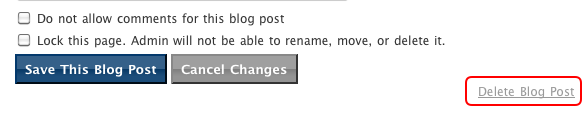
- Uncheck the "Do not allow comments for this blog post" if it's checked and you do want to allow comments.
- Click the "Save This Blog Post" button.
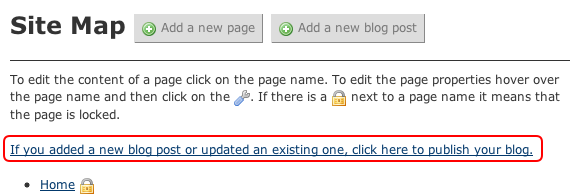
- One extra step is that every time a new blog entry is added, or if an entry is updated, you will need to click on the "If you added a new blog post or updated an existing one, click here to publish your blog." link on the sitemap page.
The latest entry will be published to the RSS feed http://thenameofyoursite.com/atom.xml .
Second Option
The second way to add a new blog post is that you can add a new blog post similar to how you add a new page on the website. The only difference is that instead of clicking on "Add a new page" you click on "Add a new blog post".

Fill in the necessary information. Please see Steps #4 through #8 listed above.
Keep in mind that once a blog page has been created, the page is live instantly. Be sure to have your content and pictures ready to add to the text module when you create a new blog post from the Sitemap page.
Editing Blog Content
Editing the content/modules on the blog page works just the same way as editing modules on the regular web pages.
Deleting Blog Posts
If you want to delete a blog post, you can do so by going to the Page Properties of a page. In the bottom right hand side you should see a delete button.
You can get to the Page Properties by clicking on the the wrench icon when in the Site Map OR by clicking on "Edit Page" when viewing the actual page on the website.