Add a Single Image
Example
 Lorem ipsum dolor sit amet, consetetur sadipscing elitr, sed diam nonumy eirmod tempor invidunt ut labore et dolore magna aliquyam erat, sed diam voluptua. At vero eos et accusam et justo duo dolores et ea rebum. Stet clita kasd gubergren, no sea takimata sanctus est Lorem ipsum dolor sit amet. Lorem ipsum dolor sit amet, bold text italic text consetetur sadipscing elitr, sed diam nonumy eirmod tempor invidunt ut labore et dolore magna aliquyam erat, sed diam voluptua. At vero eos et accusam et justo duo dolores et ea rebum. Stet clita kasd gubergren, no sea takimata sanctus est Lorem ipsum dolor sit amet. Lorem ipsum dolor sit amet, consetetur sadipscing elitr, sed diam nonumy eirmod tempor invidunt ut labore et dolore magna aliquyam erat, sed diam voluptua. At vero eos et accusam et justo duo dolores et ea rebum. Stet clita kasd gubergren, no sea takimata sanctus est Lorem ipsum dolor sit amet.
Please review Getting Images Ready for the Web before uploading images to the website.
How to adjust the size of the video
- Click play.

- Click Settings.

- Select Quality. Then select the desired video resolution. We recommend that you view the video in "720p60 HD".
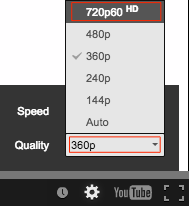
- Then click on "Full screen".

- To exit full screen, hit the "esc" key on your keyboard or click on the "Exit Full Screen" button at the top of your screen.

Add a Single Image to the Text Editor
 You can add a single image to the text editor by doing the following:
- Place your cursor at the beginning of the paragraph you want the image to appear.
- Click on the "Image" icon.
- A pop up window will appear titled "Image Properties".
- Click the "Browse Server" button.

- A larger pop-up window will appear. In the upper left hand corner, the "_userfiles" directory will automatically be selected. Select the "image" directory.
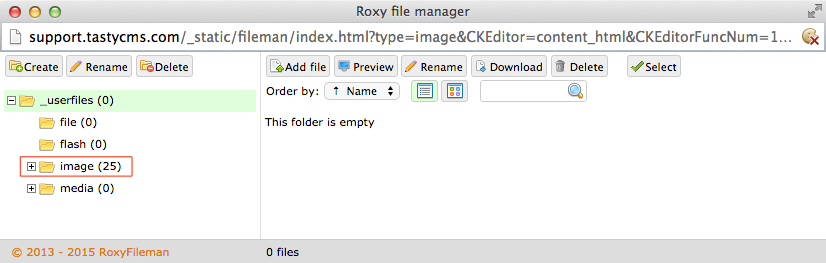
- Click on "Add file".

- A small pop-up window opens titled "Upload files". Click "Choose Files".
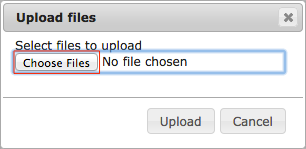
- Navigate to the appropriate image on your computer and click “Open”.
- Next, click “Upload”. After the image is uploaded, the image will appear in the image directory.
- Select the appropriate image.
- Click on "Select" in the top right side of the pop-up window.

The large po-pup window will close and the link to the image will appear in the “URL” field.
WARNING: Please do NOT upload image files that exceed 1mb. - To allow text to wrap around the image select the "Alignment" - Left or Right. (If you want the image to be on the left side of the content, choose Left. If you want the image to be on the right side of the content, choose right.)
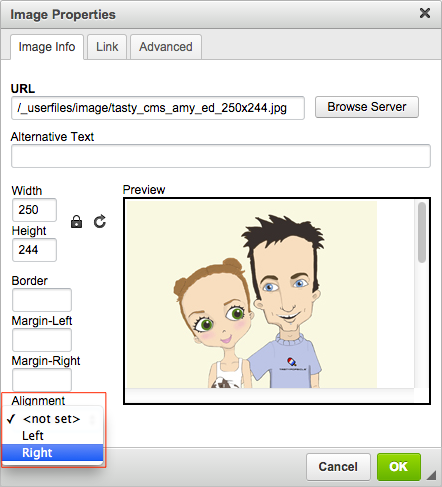
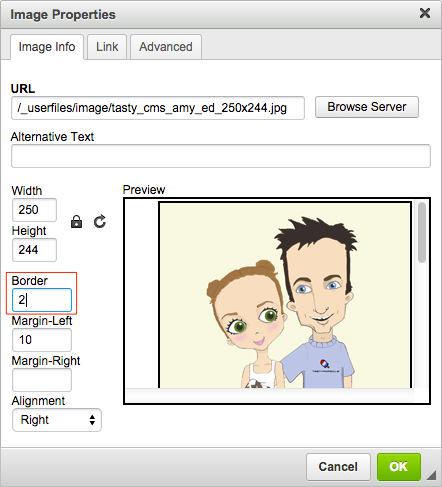
- "Margin-left" & "Margin-right" controls the amount of padding (or pixels) between the text and the image. In the picture example example above, the image is aligned to the right so a number needs to be added into the "Margin-left" field. If an image was aligned to the left, then a number would need to be added to the "Margin-right" field. Typically, a number between 5 and 10 is sufficient.

- You have the option of placing a border around the picture. Again, the number represents the amount of pixels that will be added. If you type the number 2 into the border field, the CMS will create a 2 pixel border around the picture.
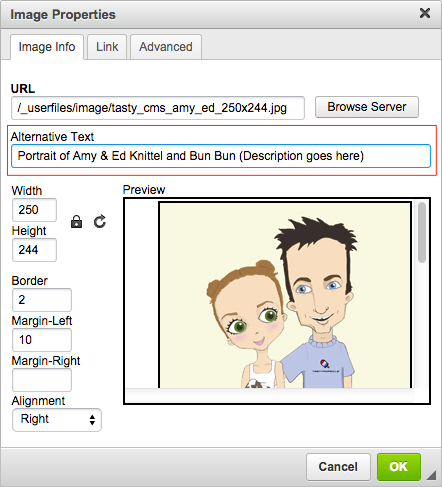
- Alternative Text - Write a description of the picture in the "Alternative Text" field. To learn more, click here.
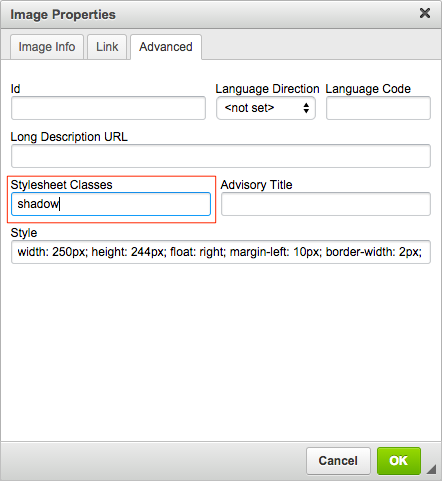
- Click on the "Advanced" tab. Type the word "shadow" in the "Stylesheet Classes" field if you want the image to have a drop a shadow.
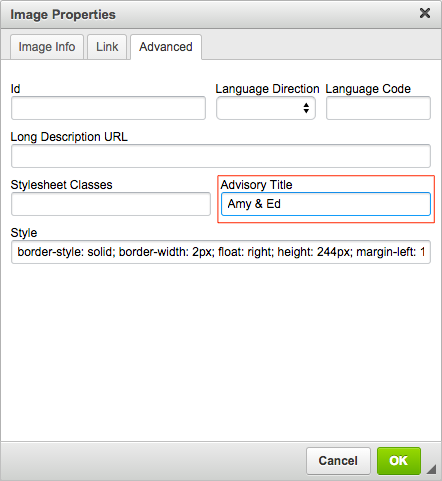
- "Advisory Title" - If you want text to appear when a cursor hovers over the image, then type in a title for the image here.

- Once complete click “OK”.
-
Click "Save this content" at the bottom of the page.